

I actually got this kit last December with my dad (asked my dad actually), so I could consider this as Christmas present from him already...
Well I'm not new to building model ships, this is actually my second kit. My first one was when I was about 10 years old (which I also asked my dad to get me...), it was a 1/700 aircraft carrier, I forgot the model, but I assembled it in about 2 hours flat. I just think it's cool to have an aircraft carrier model with all those planes lining up the deck.
I did paint the model's main deck and the aircraft's cockpits with some Tamiya enamels, I still got those old bottles but they're all dried up now... and they were applied like a 10 year old. but I was happy that time, sadly all that remains of it now was the lower hull...
That was about at least 10 years ago... 11... 10...
That was about at least 10 years ago... 11... 10...
So about this kit. It's a Trumpeter brand 1/350 Japanese Kongo class destroyer which was based from an Arleigh Burke class ship of the U.S. Navy. (Here's the Wikipedia page for more interesting info...) The model measures 46 cm in length, and is a lot different from Bandai Plamo kits. And you'll need at least a plastic cement to assemble the kit (and the usual modeling tools...)
Read on for the build progress... (pretty long one though, but not boring I hope...)
The kit would come with a color and decal guide...

Waterslide decals

Instruction manual of course...

The parts...

A piece was already broken while inside the box, luckily it's easy to fix and replace that part by scratch building my own... (can you imagine building a complete radar tower from scratch???) and this piece is on the foremost part of the ship's hull...

Mostly pieces of the radar tower and other details...

Parts from below the ship's hull and the base/stand.

More smaller details...

Some pieces of the ship's Super Structure (the structures above the ship's main deck...).

The main deck and the waterline plate...

Awesome SH-60J Helicopter in transparent plastic. (I think I want to scratch build new rotor blades since these are just too thick for my taste...)

The main hull... Long piece... (I think I actually have big hands...)

The proccess of building model ship kits are a lot different from the proccess building Gundams. Model ship kits requires a lot of studying first before you assemble and finish the model, you must know what to paint or glue first before some other things, and also requieres much more care and patience since these have very little and fragile parts and details...
Here's what I've done in the last 3-4 days...
So #1. Assemble the turret and slap it on the main deck, then drop the main deck on the hull.
Easy right? not actually...

The parts aren't as perfect as the nearly perfect Bandai, there would be some GAPS, SEAMLINES, and FLASHES and other factory molding problems you'll have to fix yourself... but that's just normal for scale modeling...


Easy fix... I applied some putty on those gaps (Mr. Surfacer 500)... let dry, then sand away the excess...


Test fit just to see an awesome turret on a deck... (still unsanded...)

#2. Put on the little details... I actually skipped this part and every other parts like these while building the kit... It's because I need to fix and remove all those gaps of the main structures of the ship first with putty (or other things) and it's easier to work on the model without worrying about those little pieces which might break, and I might need to paint those other details first before permanently cementing them onto the ship.

Some Super Structure work in progress...


Test Fit... (the main deck is currently just taped onto the main hull... still needs cementing and gap removal later...)

Some of the pieces are still not cemented together since I (you) still have to work on some other things here and there from time to time...

More gaps...


Inside the first Super Structure... below the Bridge...

The build of the Super Struture are only supported by small tabs, so I did a little something about it...


I added pieces of Plastic tubes (balloon sticks) cemented to the edges to add support to the construction and to make the overall build of the kit more sturdy and stable...


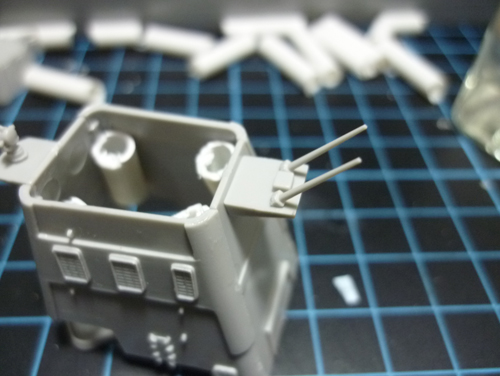

This part, I would assume it's the giant mufflers... so it should be drilled (and detailed...)

Here it is drilled and detailed... now that looks like a really convincing muffler...


The second Super Structure...


I also drilled and detailed those second mufflers...


Details will be added later after I have removed the gaps and other seamlines and problematic things...

Test fit... the bridge is still not cemented together...


The "already fixed" turrent...

Bridge details


Mufflers ( or smoke stacks... or whatever you wanna call them...)

some more gaps...


Blank details...

an cemented parts...

4 DAYS OF WORK ACTUALLY... just to note...
Now I should remove the seamlines and add details for the next WIP post...
the PG Strike Freedom might have to wait until I get new nippers...
Until next post!
Great review and build-up. Doing a very fine job too!
ReplyDeleteI am building 1/350 scale carrier strike groups for all of the world's major sea powers. An ambitious and very long project. As a part of that, I am building a Japoanese Group around the Hyuga DDH-181...but hope one day they offer a 1/350 scale model of the newer, bigger 22DDH carriers. Anyhow, I will build the DDG-177 Atago by Trumpeter as one of its escorts so am really interested in your build here.
You can see all of my reviews and buildups (both those completed and thos eplanned) here:
http://www.jeffhead.com/modelbuilds/
Again, great wrok. Thanks!
hehe thanks for the comment!
Deletebut I'm not really an expert on building model ships... it just happened that I was creating a simple diorama of a scene from an Anime called Evangelion and it needs a ship...
This was actually just my 2nd build, 1st in this scale... my very first was a 1/700 enterprise aircraft carrier more than 10 years ago...
I'm actually wanting to build another, 1/350 Panteleyev from trumpeter, and also put in in another diorama. I would also like to step up on my ship modeling in the future hopefully...
I would also like to add 3rd party products next time, like extra photo etch parts for more details on the Panteleyev, especially thos realings and radar towers which are probably the best details to add to a ship...
anyways, thanks for the praise! hope to see a build-up of your panteleyev in the future hehehe...