
 Basically, my plan was to make this Wing Zero heavily damaged as if it survived the last battle from the OVA Endless Waltz.
  I modified the backpack so that there's a hole below for the stand.
 I also did some pla-plating (hells yeah!!!) on it just to see why pla-plating seems so cool.
I used a rotary tool make the shoulder armors thinner and also made some battle damages.
I also proceeded on sanding them down.


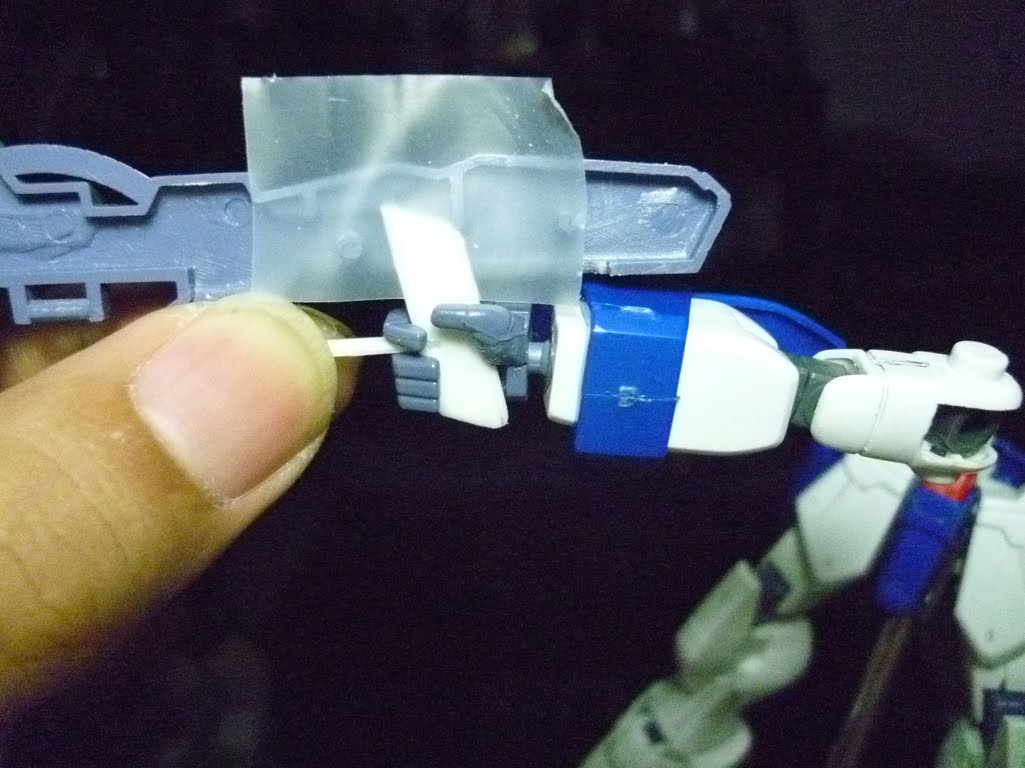
One small but MAJOR modification I did to this kit was to change the handles of the twin buster rifle, since it can't hold them properly at all... Everytime I made Wing Zero hold the rifle, it falls. So I made new handles from Pla-plates. (Hells Yeah!!!)
It's not yet cemented to the rifle, but I'll get to that...

SEE HOW IT HOLDS THE BFG?!?!?
I also used a rotary tool to modify the side skirts of the lower leg armor to allow further movement to the lower front armor (the ones above the feet). The first pic is the original look of it, the next three is after the modification. Though I think I might make them thinner like the shoulder armors.
And I also put back the lower front armor together using pla-plates (Hells Yeah!!!) on the inside.


Talking About Wing Zero... here's the progress of the wings...
I made 14 new feathers... A pain in the ass using plastic sheets about 3mm-4mm thick. I don't know the exact material but it sure is hard. But did it nevertheless... I super glued twisties (from transformer toys, since it's thick but bendable just enough). I have yet to cover that up with putty or epoxy or such... The battle damage look came out... ok, i guees...

The main wing, I cut off the tip part since I'd replace that with a new one...
(the torso piece there is from a 1/144 shenlong gundam i had since the 1990's. I used them as a canvas to practice hand painting a gundam. And from the look of my table, I think I'd have to get my self a cutting mat...)
I'd still have to cut this piece in 2 or 3 for further modifications...

The inside of the wings was also modified, removing the parts that held the joints/polycaps that held the older set of "feathers" that sucked...

I also used a file to thin down the back wings...

More pics...
I added a red wire which runs from the head to the body. It doesn't really do anything rather than make it look better since the neck area seems pretty plain and boring. Will probably add Pla-plates (Hells Yeah!!!) later...
This might also prove how much a noob I am in gunpla... all the scratches I did from deepening the panel line show in this picture... a pain in the eyes... I wish that wouldn't show after the painting progress...

For some reason... I think I like this High Grade Head more than the Master Grade... It just seems more bad-ass than the MG. But maybe it's just because I still haven't had the MG Wing Zero yet... and I still have to fix the seamlines on this thing...

I also tested myself on painting by hand, since I don't have an airbrush yet... I used parts from my younger brother's old 1/144 Shenlong Gundam. Painted them with tamiya XF-8 flat blue mixed with acrylic thinner (on about 1:1 ratio... enough to make it look like water)... I guess I did ok, but I need to be more careful on the time when the paint starts to build up on the edges...


Untill next post...
Pla-plating... Hells Yeah!!!

No comments:
Post a Comment